| Rounded Table Edges Tutorial, Photoshop 5.0+ by squage |
|
Rounded Table Edges in 3 Easy Steps
Difficulty: Very Easy - Easy
Skill Level: Basic
Time Req: 2-3 Minutes
Credits: Matt Jacob (squage)
Step 1
------------
Start with a new document, and make it the width of your table. I started with 400x40, but of course, you can change it to suit your needs.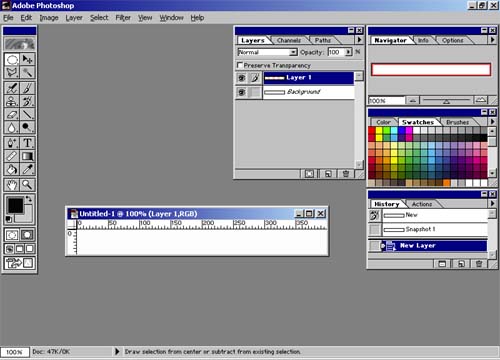
Step 2
------------
Make a new layer. This is where your bar will go.Now make a perfectly round ellipse (circle) by holding holding down shift while dragging the tool. Fill it in with the color you will want your bar to be. I used black, as you can see in this example. Drag a new guide to the middle of your circle. Now drag this layer, which contains the circle, to the  to copy the layer. Go to your new layer and drag a guide to the middle of that circle, also. to copy the layer. Go to your new layer and drag a guide to the middle of that circle, also. 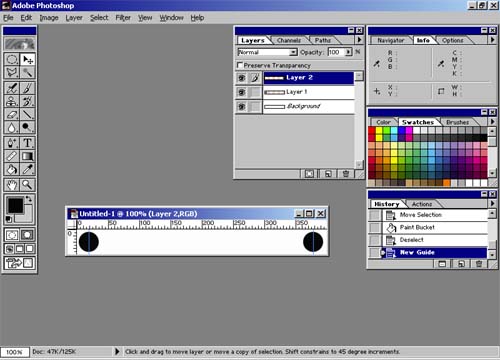
Step 3
------------
This step gets a little tricky, so pay close attention.Click on the layer that your second circle is in, and press CTRL+E to combine both of the circle layers into one layer. Now drag guides to the top and bottom of the circles. Make a new rectangle selection between the guides, then press the
delete key. Without deselecting, fill the rectangle with black (or your color of choice.) Now you should see what I have to the left. It looks like a giant pill-shaped button. Clear all the current guides by selecting it from the View menu. Drag a new guide to the horizontal half of the pill, and then make a rectangle selection from the top of the image to the guide. Press CTRL+SHIFT+I to invert the selection. Now press the delete key. This will leave you with the part of the image that you want selected, and now you're done. 
Finishing Up:
------------
As you can see, I made my edge to use with a black table and a white background. This is the bar in its most basic form. You can change colors or add text to your heart's content, but the basic tutorial stays the same.
=====END=====
|
|
|
©Copyright by ubbdev.com and respective artist/author. This tutorial may not be added to any collection or sold without prior permission. Contact ubbdev.com or individual author for more information.
|
|
|


